This quick start guide will help you perform the three main functions of Papyrus - Adding a Member, cataloguing a book, issuing the book to the member.
There are also training and tutorial videos under the Help menu.
Papyrus has the main functions along the Menu Bar. In this quick start guide, we will look at Members, Cataloguing and Front Desk
Below the menu, the main screen will show you the number of members, books, stock items and items on issue
OPAC
This is is for searching the catalog
Members
Used for Adding, updating and deleting library members
Cataloguing
Books and other publications are Cataloged and accessioned using EasyCAT
Front Desk
Circulation of publication items, books and stock to Members
Parameters
This menu option and its sub menus manage all the parameters and settings of Papyrus
All Reports
There are lots of reports to explore. All these reports print to the screen and can then be exported in various formats
Select Library
Use this if you need to select a different Library
Logout
Log out of the Library Cloud. Use this if your computer is unattended
The Members of the Library are those people who use the library to take out books.
In this step, we will see how we add a new member into Papyrus. Member's are uniquely identified by Member Number.
A page will open asking for a member number.
You can enter a number, or search or create a new member.
The New button will open a popup form to create a new member.
For this exercise we are creating a new member. Click the New button
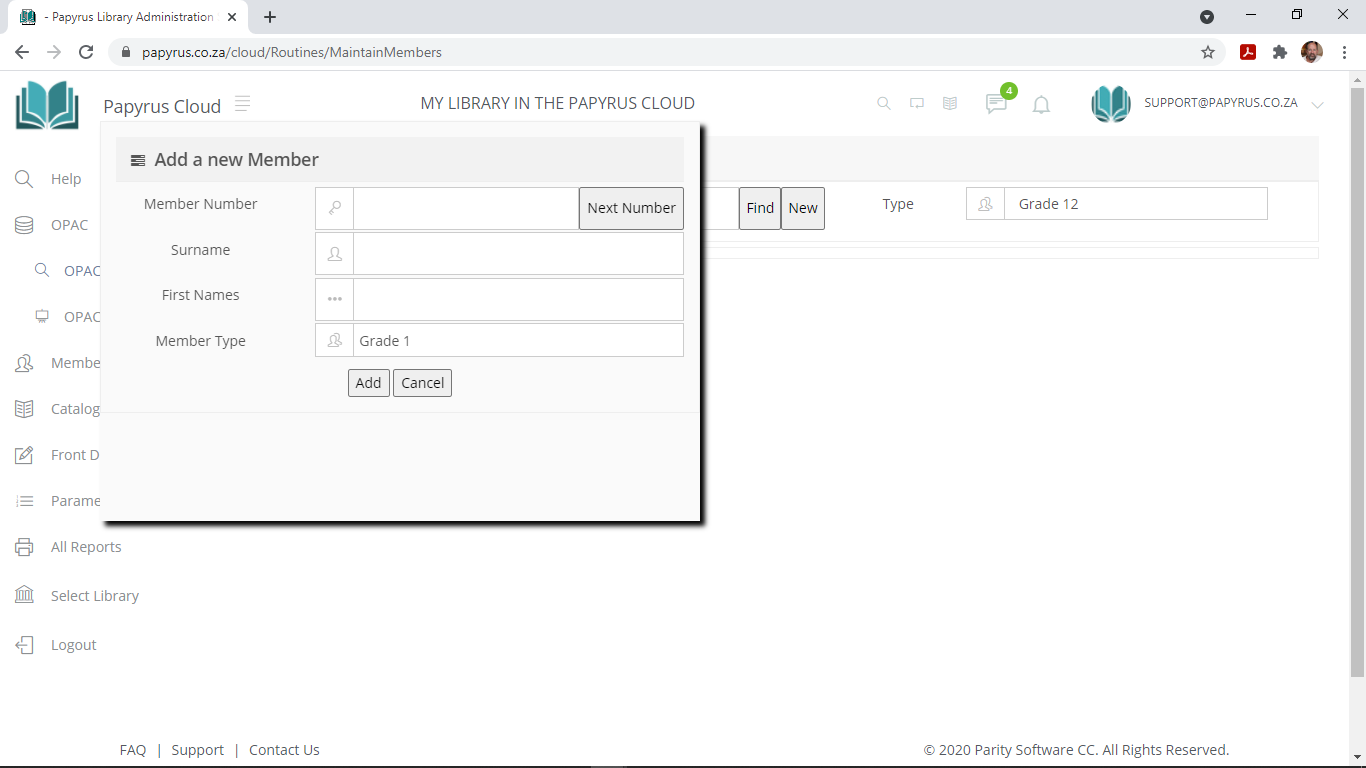 The Member Number
Click the Next Member button. You can chose a number or you can generate one. Based on the Next Member Number in the Global Parameters, a new Member Number is shown. You may use this number. Fill in the Surname and First Names of the member and chose the Member Type of the member. Then Click the ADD button
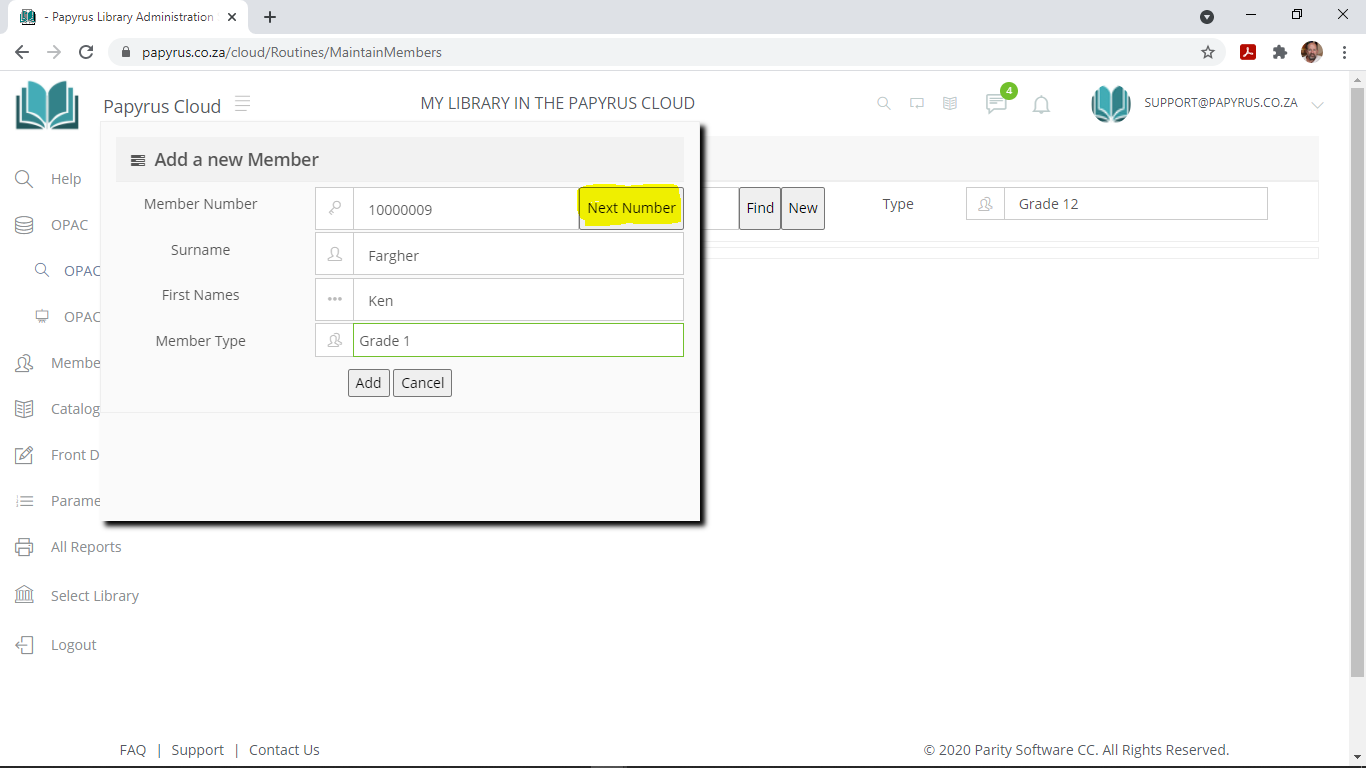 Completing the Member's Details
The screen is divided in the Basic details group and next to that several tabs which cover different aspects of the Member. Fill in the most important fields which are the Surname, First Names and the Member Type, and if possible the Email Address. The member Type that is initially selected is the Default Member Type in the Global Parameters. Use the Drop Down list to select different Member Type if necessary.
Use the Update Button to update the changes you have made
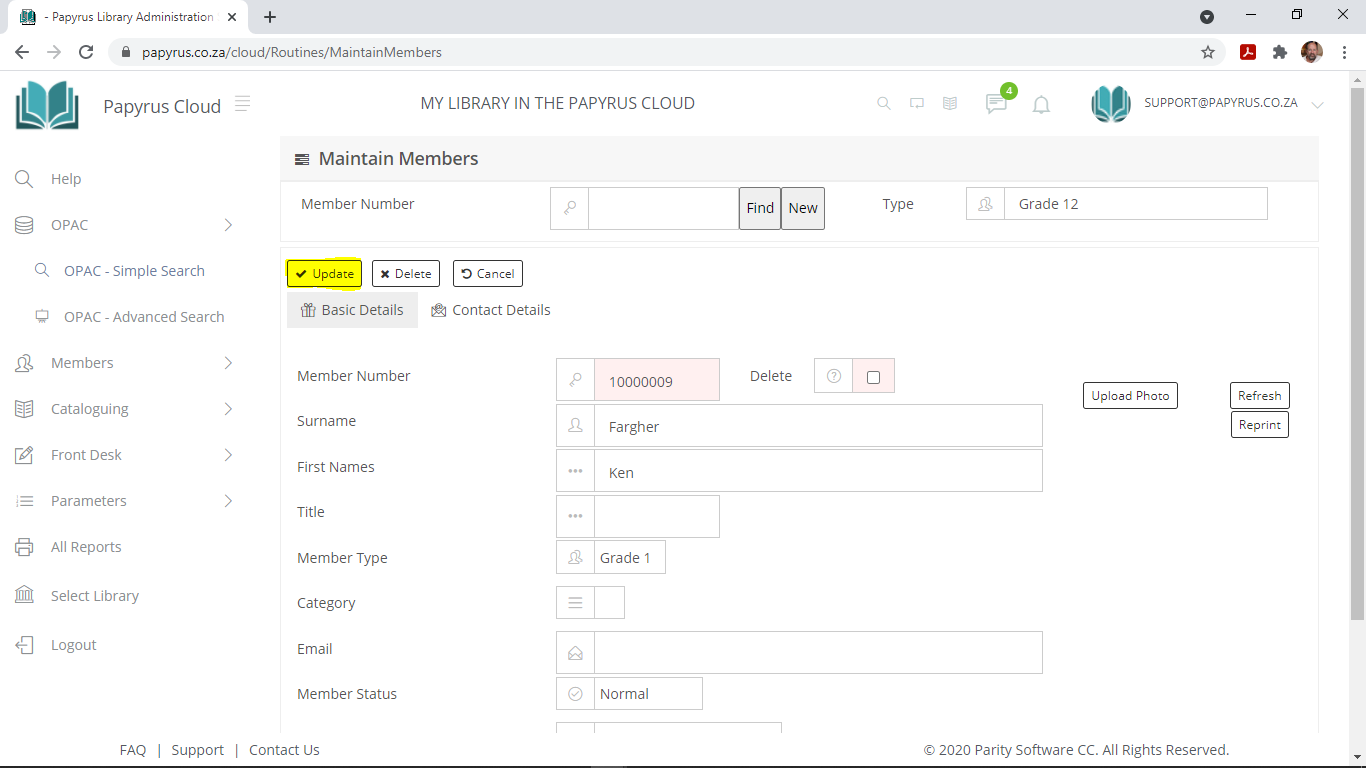
You have now created your first member in your library!
Papyrus can catalog different types of media - Books, AV Material, Web Sites, Equipment, Posters, etc. These are called Bibliographic Records. Each one is uniquely identified by a BRN or Bibliographic Reference Number. This BRN number is an internal numnber used by Papyrus. It is not the same as the Accession Number or Barcode of a book.
A BRN may not have any physical stock such as a reference to a web site, online media, etc. Most times, it would have at least one Stock item which has an Accession Number and a Barcode Number. These must be unique, and the barcode can be the same as the accession number.
We are now going to go through the steps to add a new book
There are 4 ways to catalogue a book. Each is compatible with the other.
- EasyCAT - the most popular way with the best flexibility. This is what should be used most of the time
- QuickCAT - For those starting to use Papyrus for the first time, or basic cataloguing with Title, Author and Subject
- FastCAT - More versatile than QuickCAT, with extra fields such as Publisher, Series, Shelf and Price
- AdvanceCAT - For complex, SA-MARC/US-MARC driven cataloguing, with all the 175 possible fields that can be catalogued
We will cover the EasyCAT cataloguing method
Click the Cataloguing, EasyCAT menu option
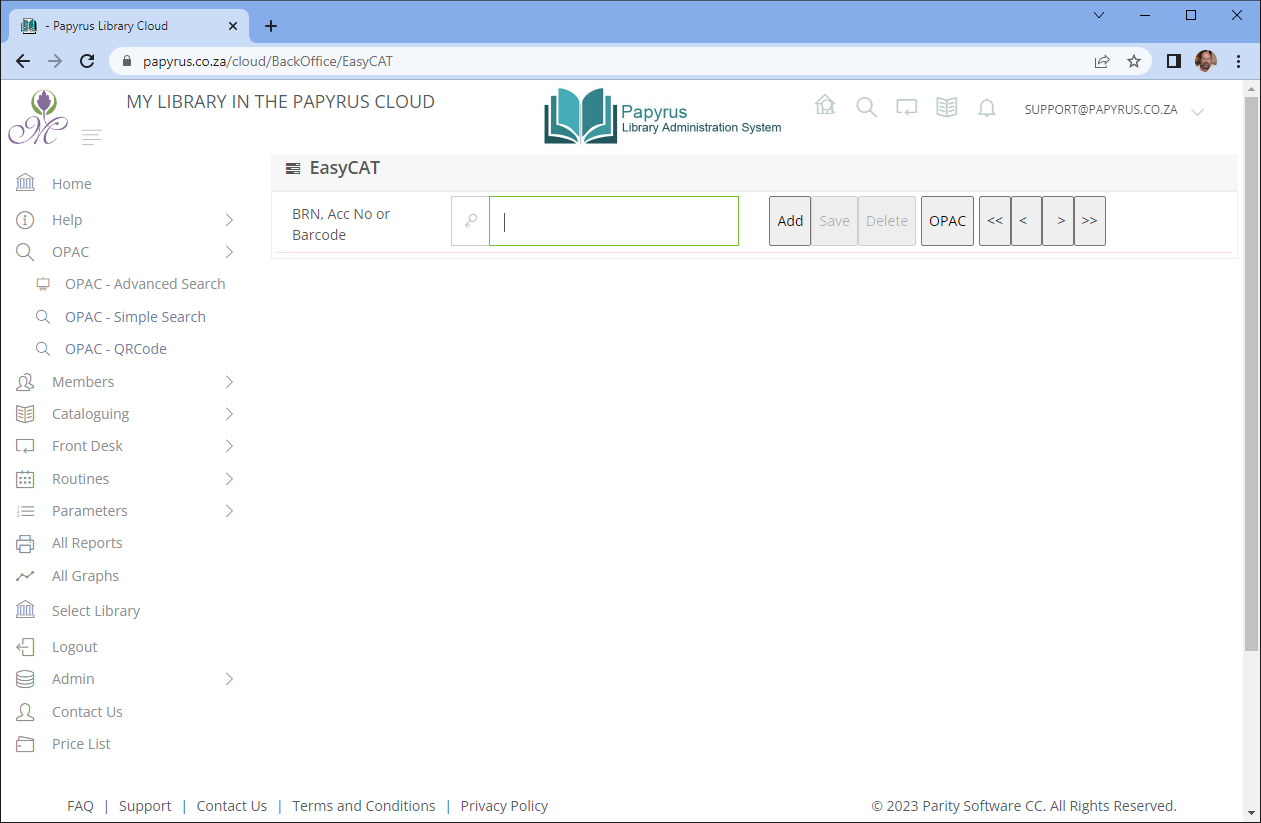
Creating a New Bibliographic Record
Now Click the Add button.
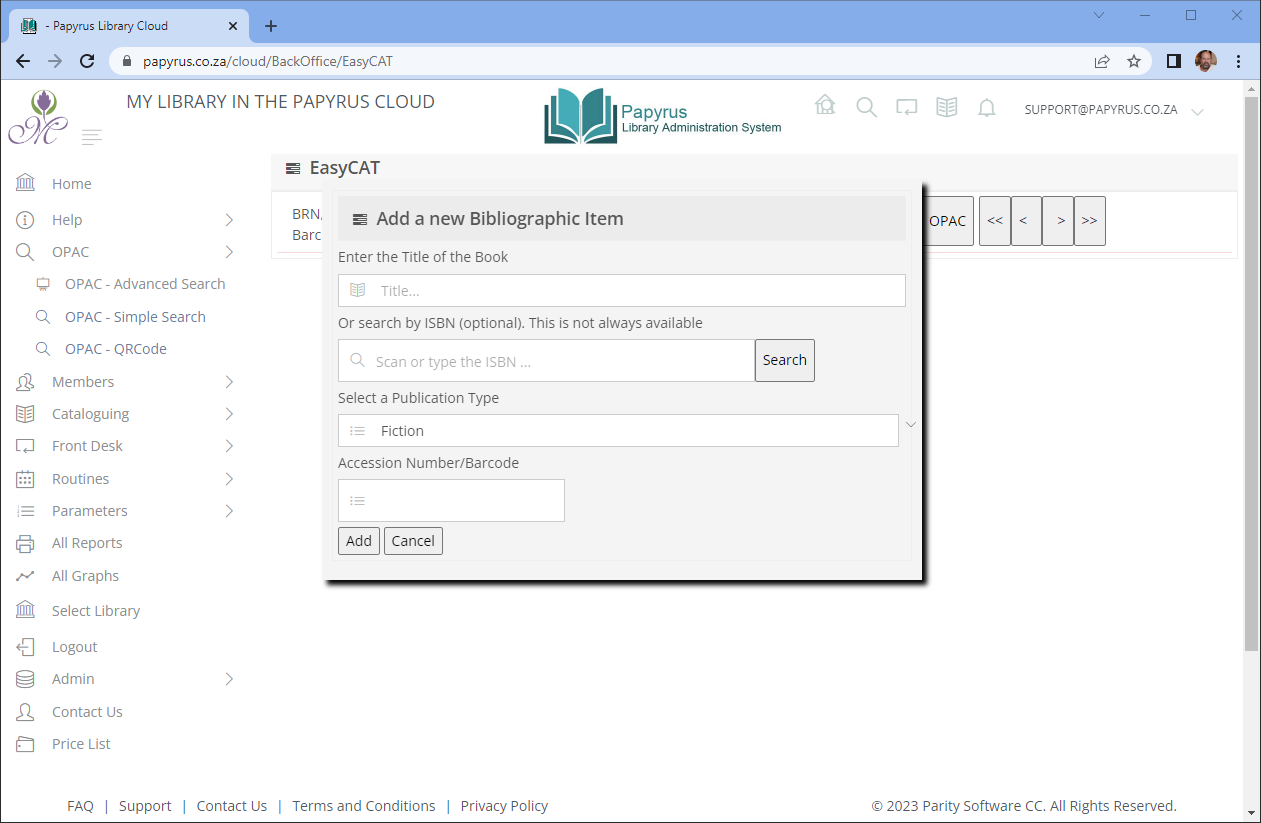
You will be be asked to fill in the Title of the Book or the ISBN number. If you scan or type in the ISBN number, click the Search button and if the ISBN has been loaded by the publisher, the Title will be found. If it cannot be found, you will need to catalogue the item yourself so fill in the Title.
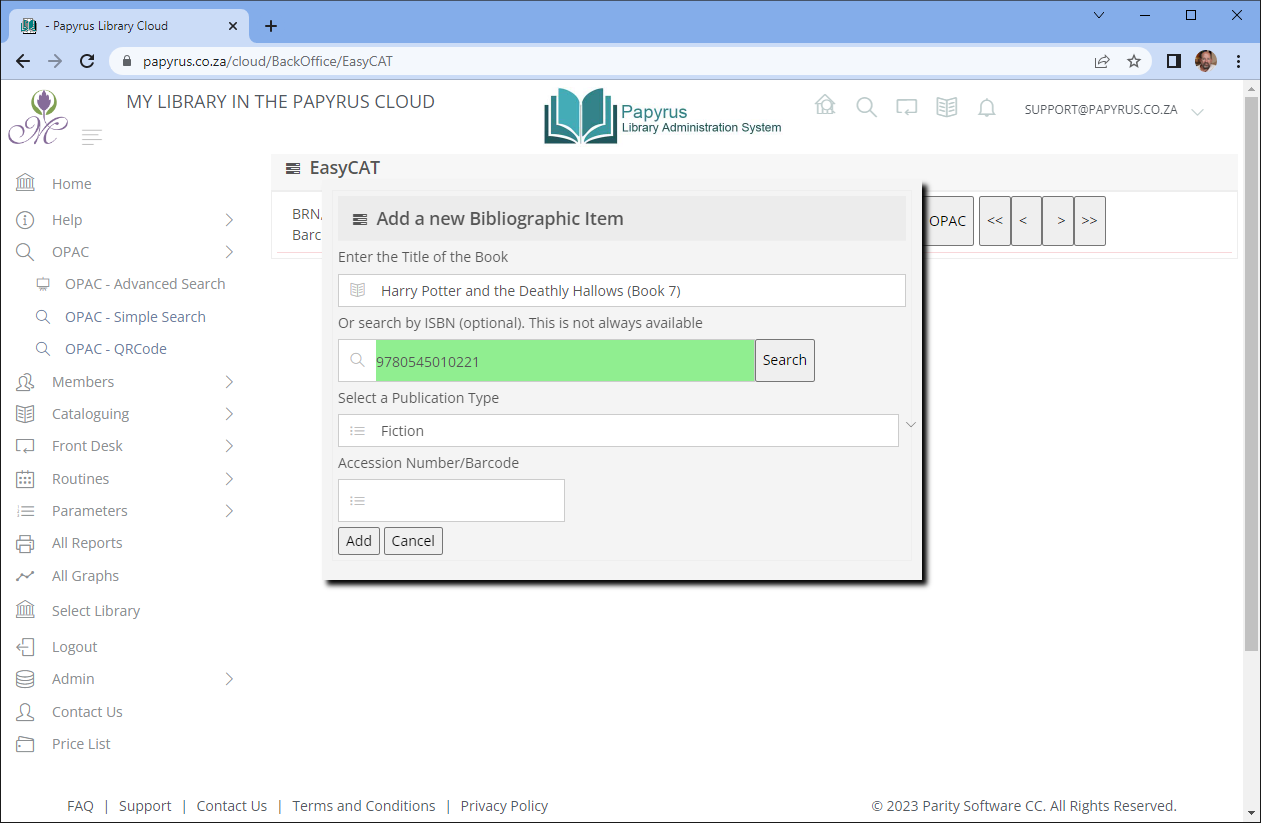
Select the type of publication such as Fiction, Non Fictions, etc
If you wish to add your own barcode number, type it in. Itr must be unique and cannot exists in the library already.
Then click the ADD button
Completing the Cataloguing
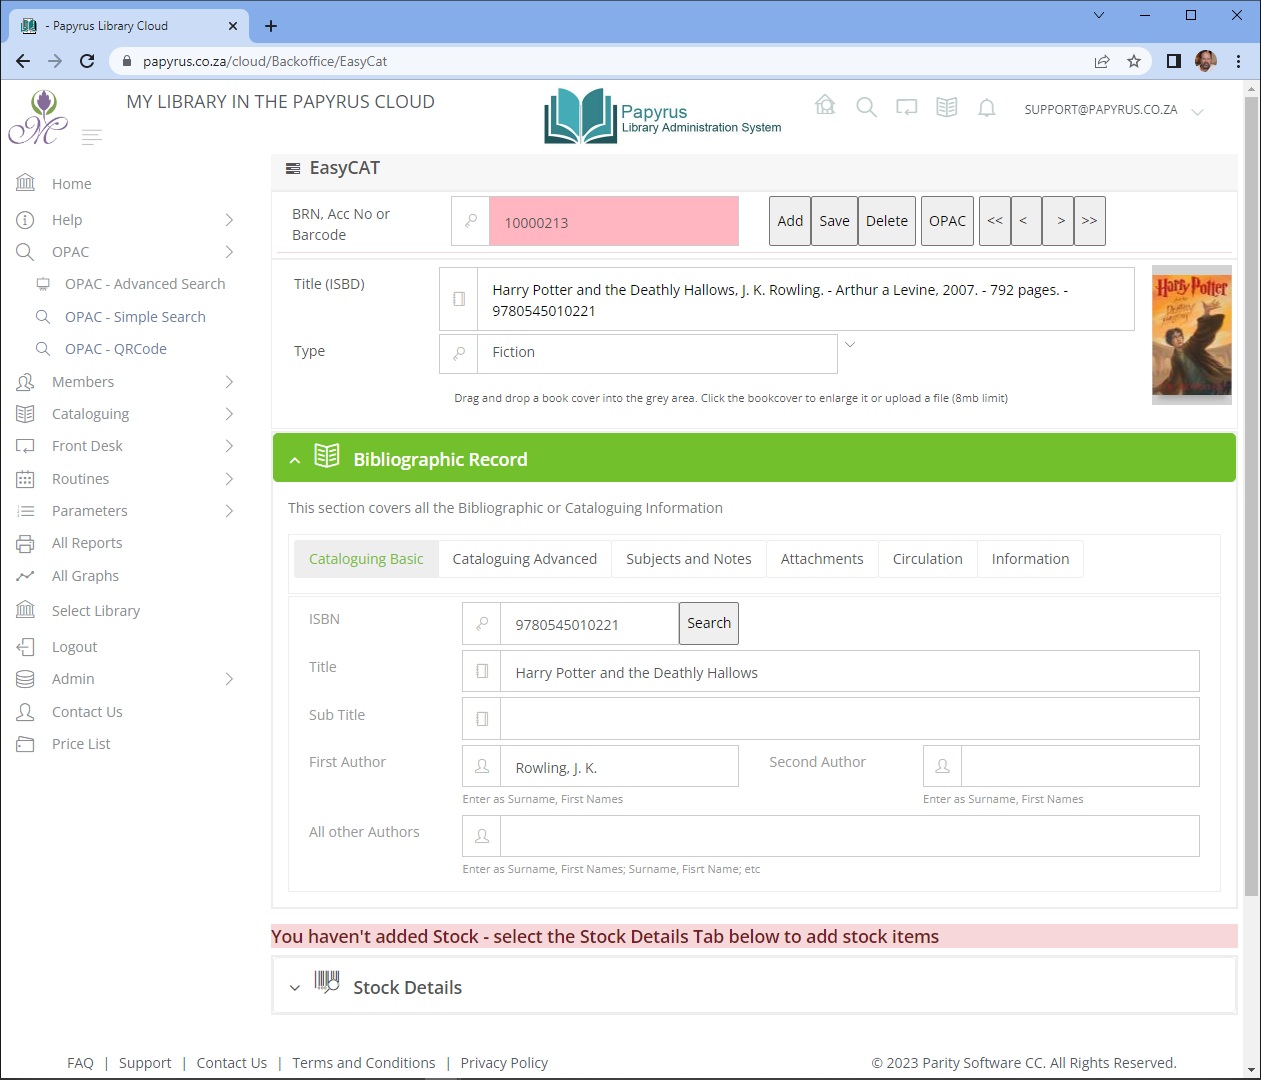
A cataloguing screen will be created. It will have the associated BRN number. The Title will be filled in
Below it, the screen has two collapsible parts. The first is the Bibliographic Record. The second part contains the Stock Details
Bibliographic Record
If the ISBN field was used to find the book, it will be included. If the ISBN was found in our database it will fill out as much information that is available in the appropriate fields. All you now do is fill in any other fields or update them. You don't have to fill in every field. The only field required is the Title Field. Once you have completed filling in the fields, click the SAVE button. This will update the ISBD or International Standard Bibliographic Description
There are additional tabs that cover Cataloguing Advanced, Subjects and Notes, Attachments, Circulation and Information. You can explore these at a laster stage
A note on Authorities
Papyrus keeps a cataloge of Authories. Simply, these include AUTHORS, SUBJECTS, SERIES, PUBLISHERS. These fields will be cross referenced with other items. You can create one author, and up to six subjects in the EasyCAT screen. If more authors and subjects are needed, the full EASYCAT cataloguing will need to be used.
When you enter an Author, use the Surname, followed by a comma and then the name or initials. If there is a second Author, place it in the second field. If there are three or more, put them into the All other Authors field, each author separated by a semicolon.
You have now created your first catalogued item! However this does not define the physical stock you have of the item. Whether you have one or multiple copies of the same item you will need to add their details into Adding Stock
Each Bibliographic record can have one or many related Stock records saving the time required to catalog each one separately and keeping them in a logical group
You have catalogued the Book or Bibliographic Record. Now we deal with the physical STOCK of this book. You may have several copies of the same book. Each copy will be captured against the BRN.
Each stock item is uniquely identified by an Accession Number and in addition a Barcode Number.
At the bottom of the form, there is a Stock Collection group of fields
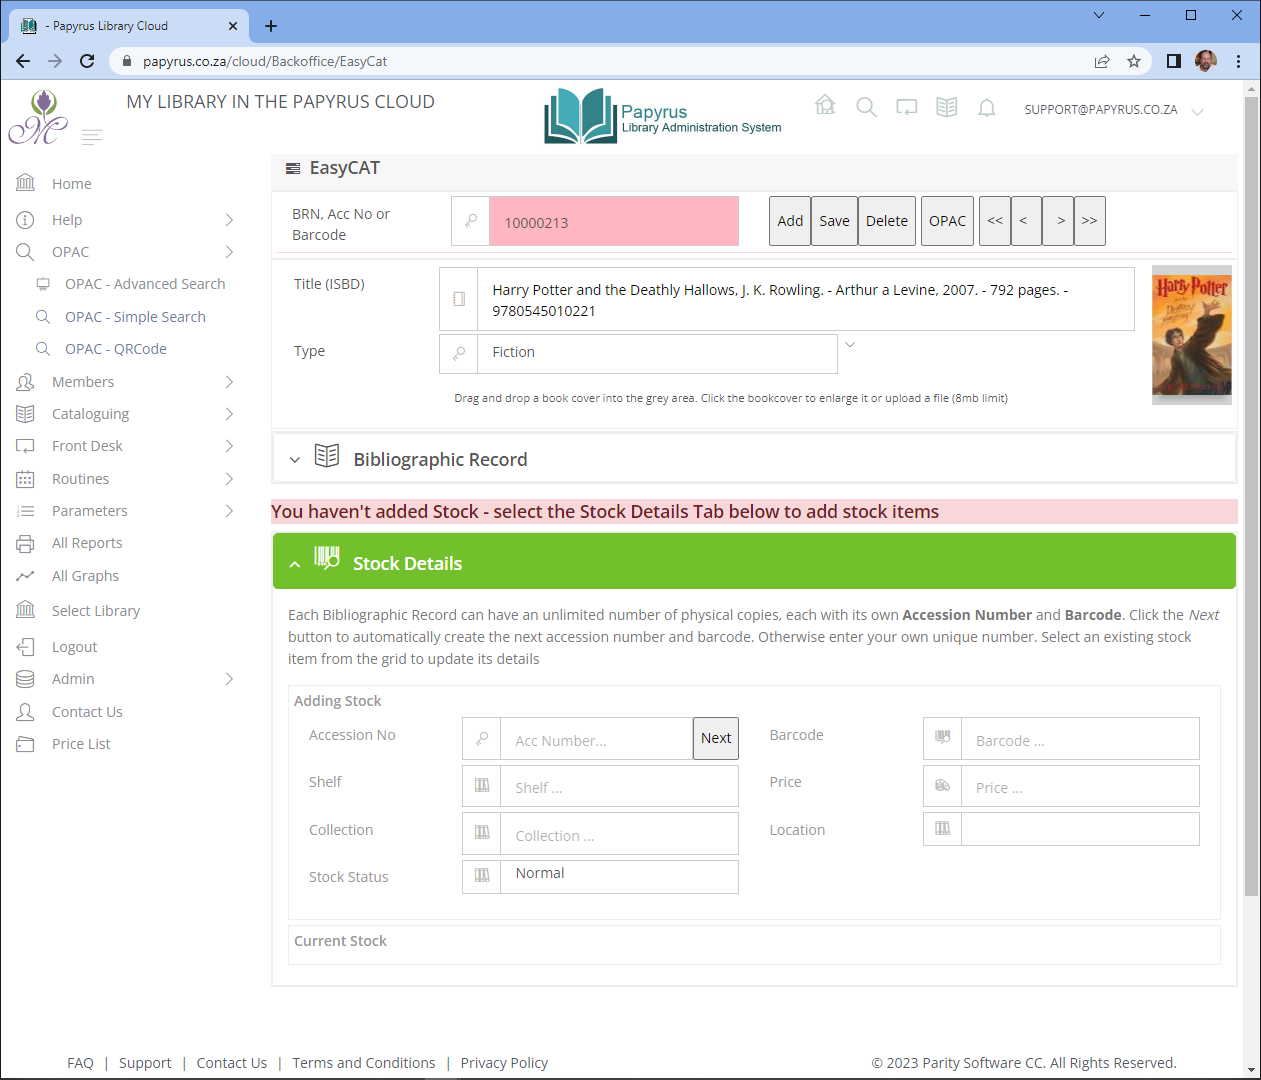
You can either enter your own Accession Number or have have Papyrus allocate a sequential one automatically by clicking the Generate button. The cursor will move to the Barcode Number, which is set the same as the accession number. It will be highlighted and ready for keyboard or scanner entry. Both barcodes and accession numbers must be unique in the system. If you have a unique barcode, you can type it in or use the scanner to scan it in. Enter the physical location or Shelf of the book.
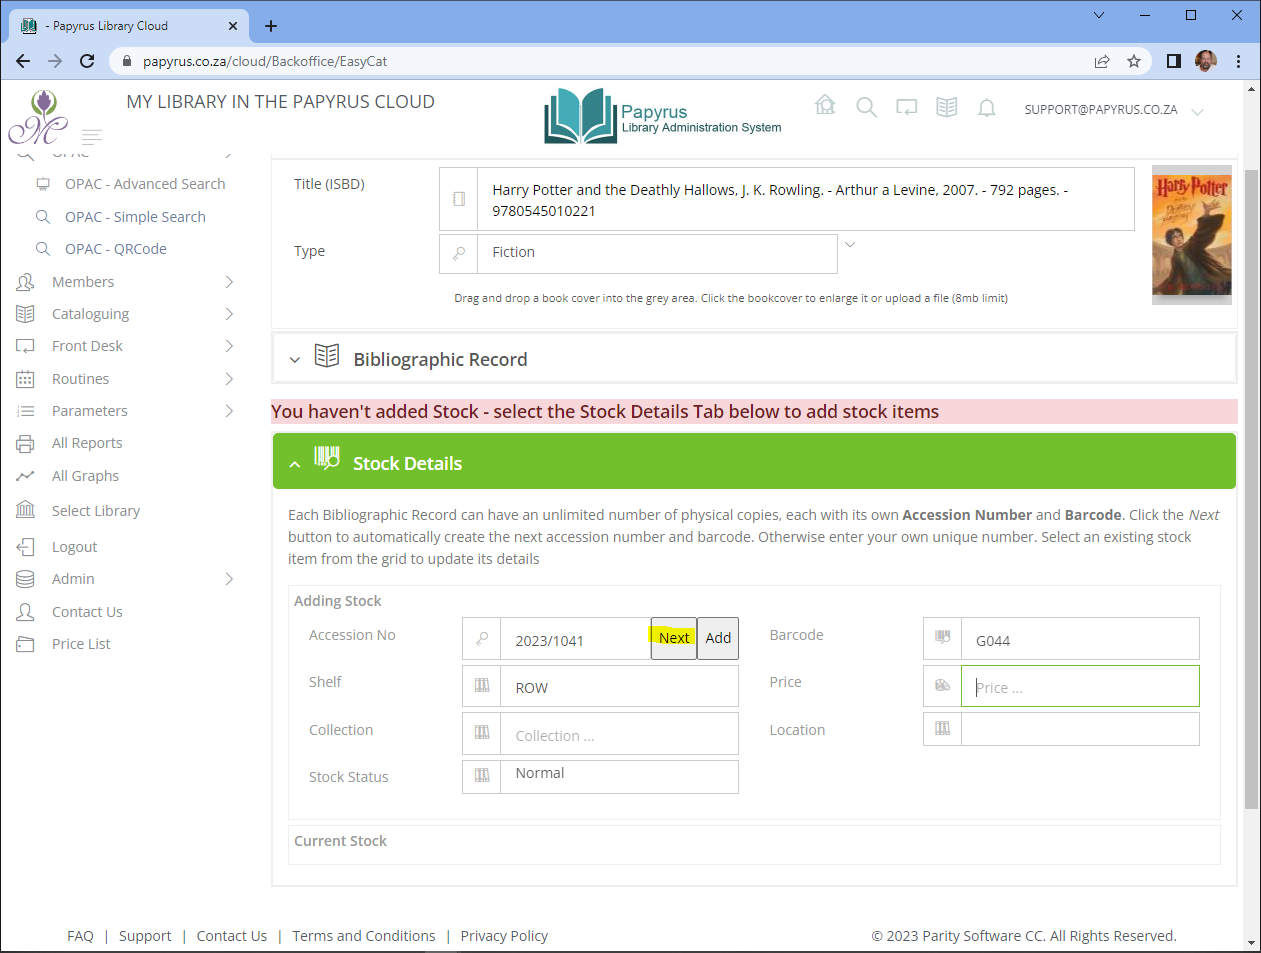
Click the Add button once you are complete. The details will be added and shown in the Current Stock table.
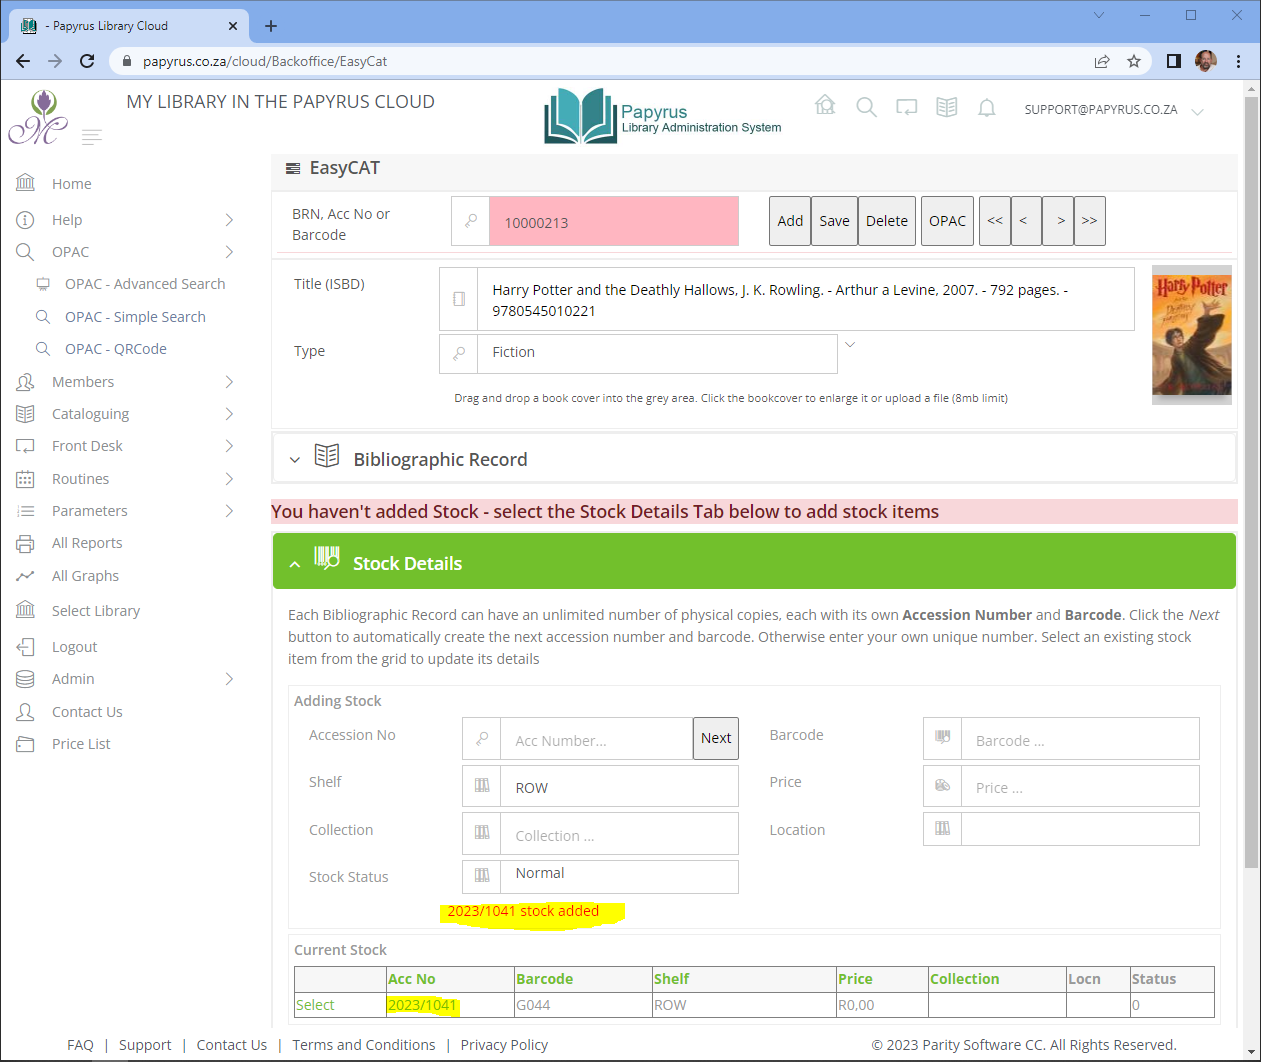
You have now added a stock item!! If you have further copies of the same book, repeat this process.
Accession Numbers and barcodes are unique. Accession Number cannot be changed as they create an audit trail of the stock items. Barcodes can be changed if you need to. Use the Edit option in the grid to edit the barcode, shelf, Collection or location of the stock item. You can also include the price.
Shelf is the shelf location of the media item. Libraries often use the 3 letters of the author's surname. Or they may use the DDC or Decimal Dewey Code. Examples would be MAR, SMI, 640.73, 3297.092 SHE, REF 330.942 CON
Collections are media that are grouped togther. Examples could be REF, SERIALS, NF, SENIOR
Locations are the highest physical ordering of the library. Keep this blank for libraries that have one building or one site. You also will need a multisite licence to use this field.
We are now ready to issue this stock item to the member. If you barcoded the book, we can use that number, otherwise write down the Accession Number in the inside cover of the book
Now that a Member has been created and a book catalogued with physical stock, we will look at how we use the Front Desk screen to select the member, select the stock item and issue it to the Member
In the example we have used, the Member number was 10000009 and the books Accession number was 2021/1189
Opening the Front Desk Screen
Usually you will click the Front Desk, Circulation Screen. menu option.
Or click here to open it in a new browser tab
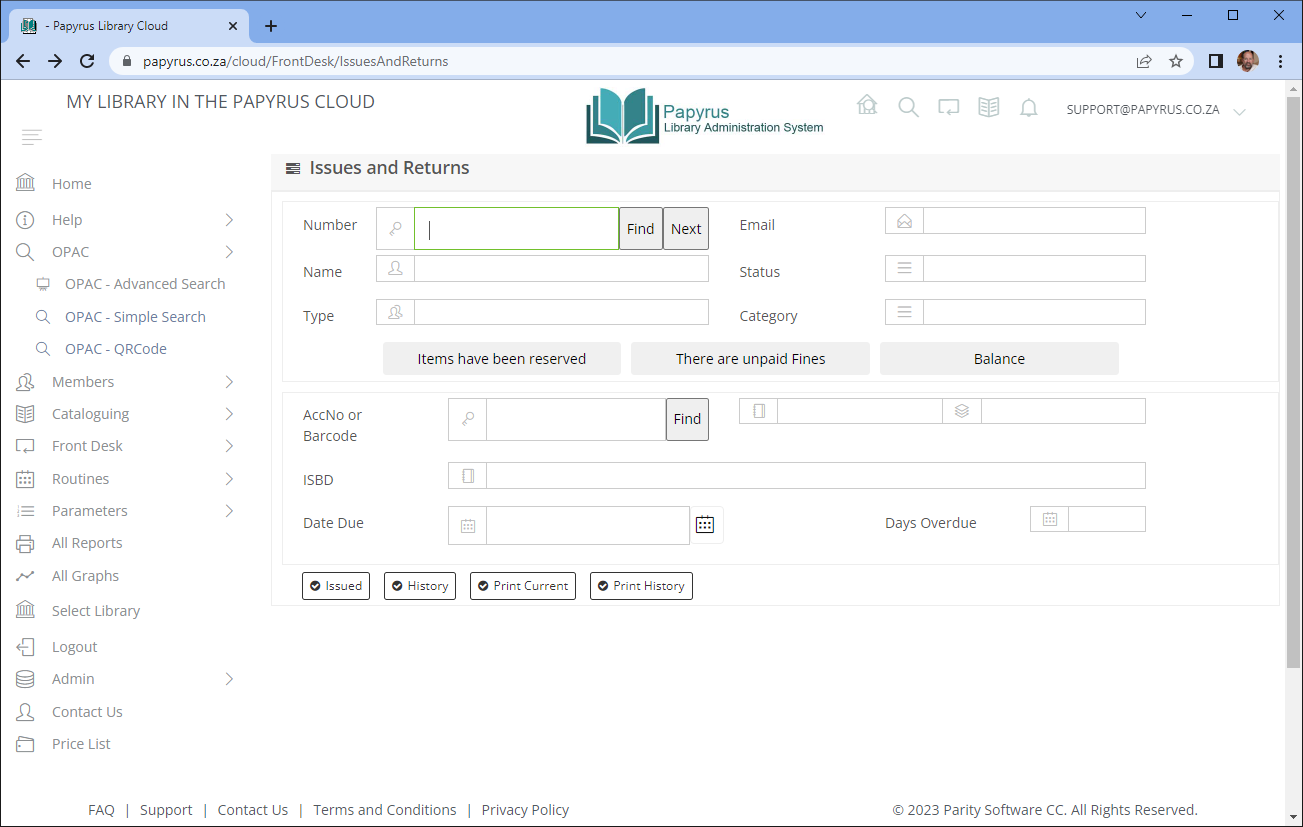
If you have been working with a Member, the member's details will be show, otherwise a blank screen will be shown. If that is the case, you will need to select a member using the Find button.
Seleting the Member
The cursor will be waiting at the Member Number field in the Members details section. There are two options for selecting a number. Type in the Member number that was used in the first step 10000009 and press the TAB key on the keyboard. Alternatively you can use the FIND button. If you use a scanner, it will scan the member number and press the tab for you automatically. If the number is correct, the Member's details will be shown
If you wish to find a member by name, use the FIND button

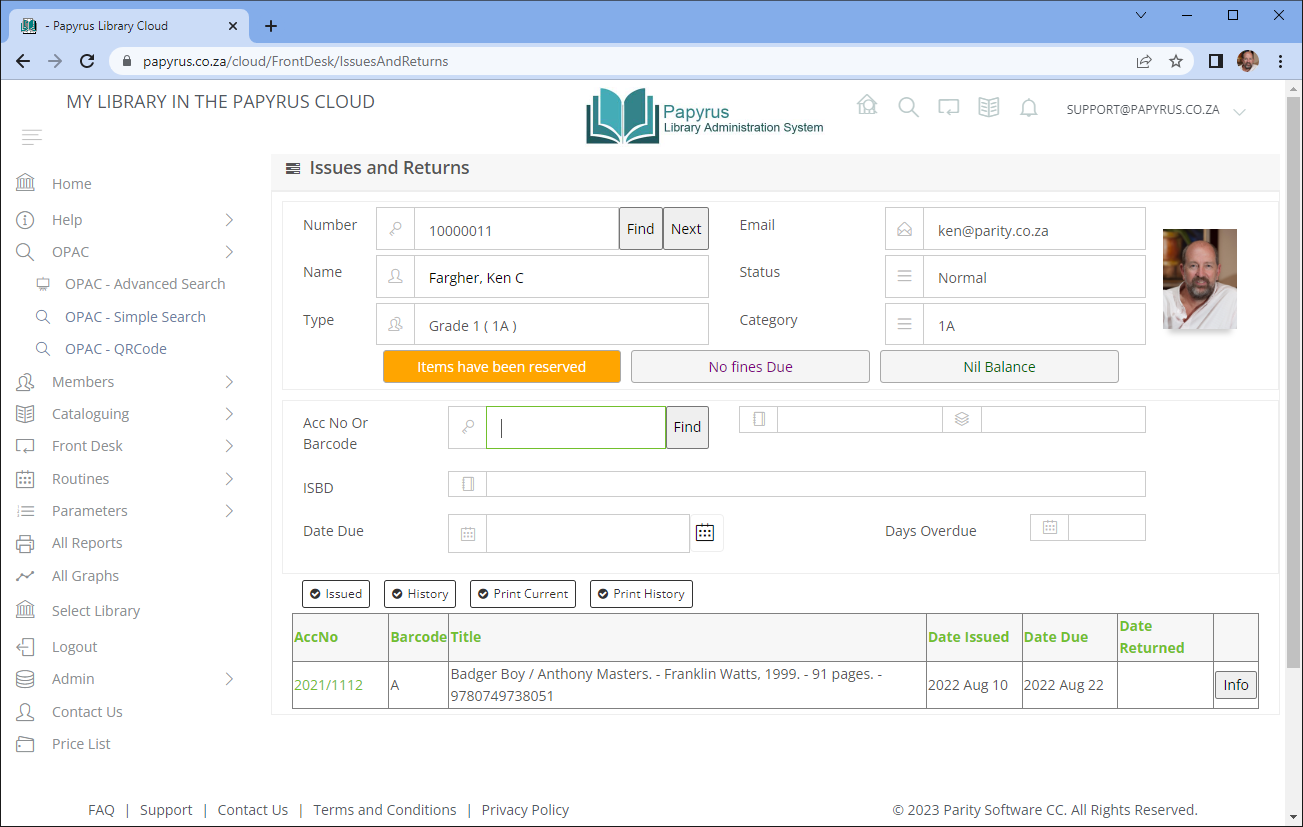
Once you have either scanned or typed in a member number or used the Find button to find them, the Member's details will be show.
Selecting the Stock
After selecting a member, the cursor will be waiting at the AccNo or Barcode. In this field, either the Accession Number or the Barcode of the book is typed in or scanned. Type the number used in the Adding Stock step 2021/1189and press the TAB or ENTER key on the keyboard. Alternatively you can use the FIND button. If you are using a scanner, scan in the barcode number. The scanner should be programmed to send a Carriage Return after each scan
The Bibliographic details of the stock item are displayed
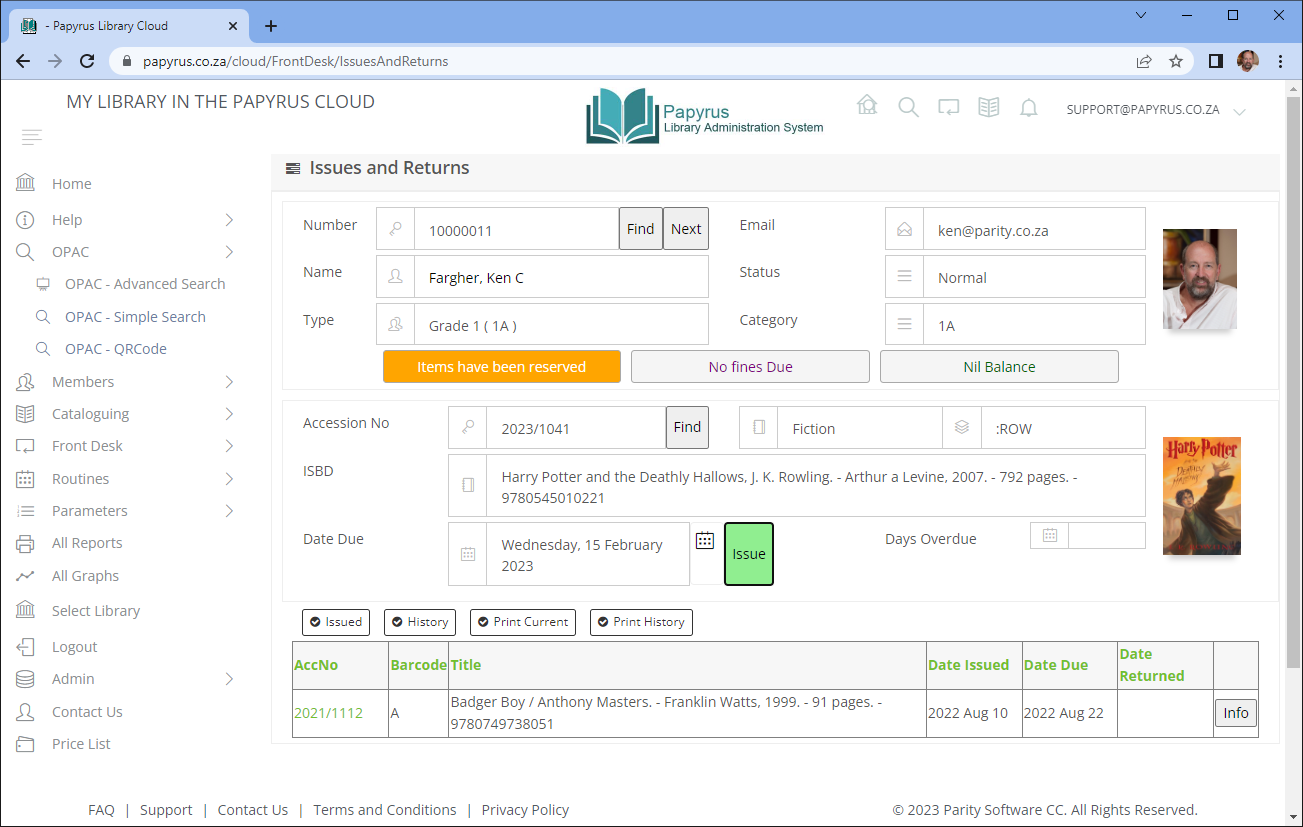
Issuing the Book
The ISSUE button will now have the focus and will be coloured green. The Return Date is calculated according to the parameters in the system. You can now press the TAB or ENTER key on the keyboard or click the ISSUE button. The book will then be issued and the details show below in the table of books issued to the member
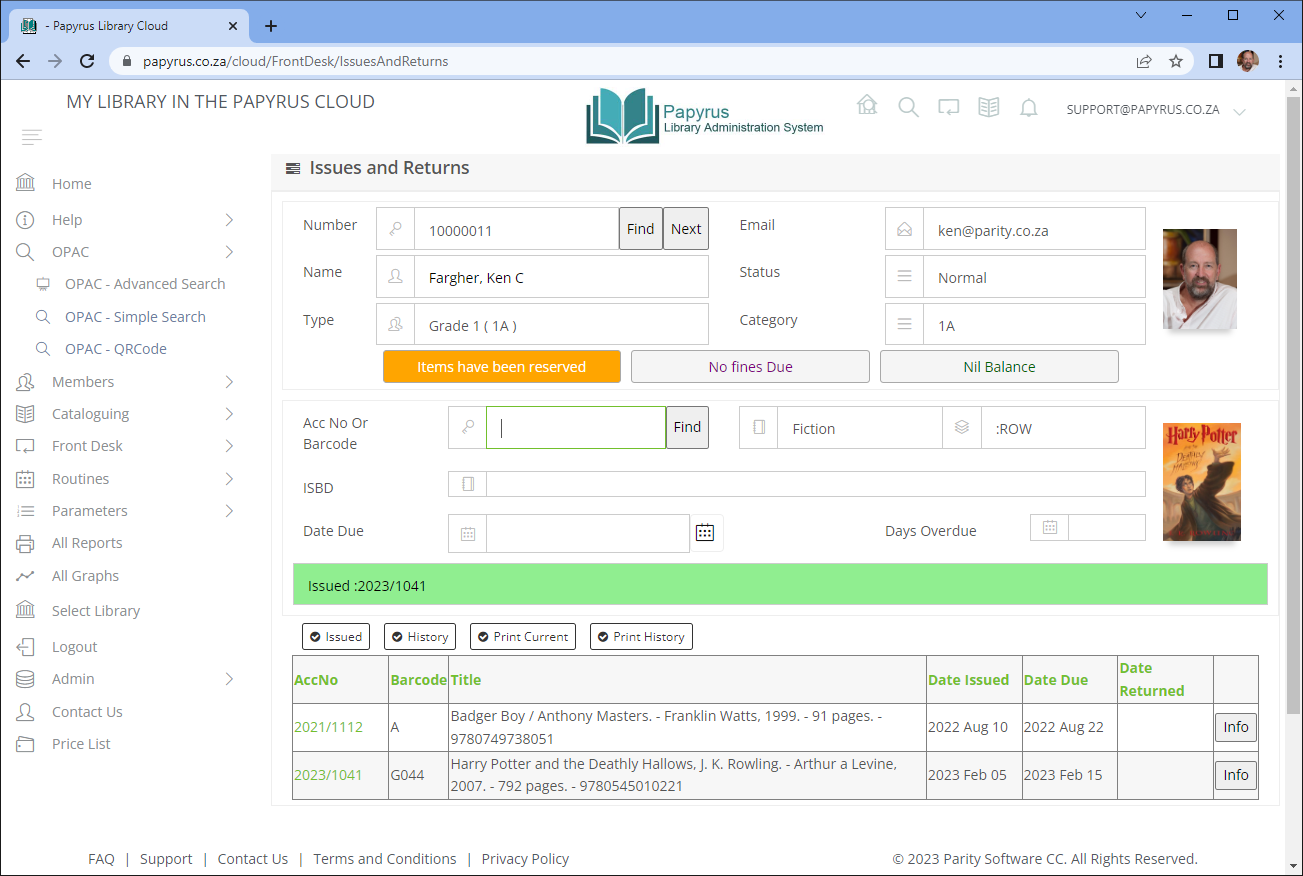 Returning the book
Books that have been issued are returned in the same way. Type the number used in the Adding Stock step 2021/1189and press the TAB or ENTER key on the keyboard. If you are using a scanner, scan in the barcode number. The RETURN button will now have the focus and will be coloured blue. The Fine is calculated if it is overdue. You can now press the TAB or ENTER key on the keyboard or click the RETURN button.
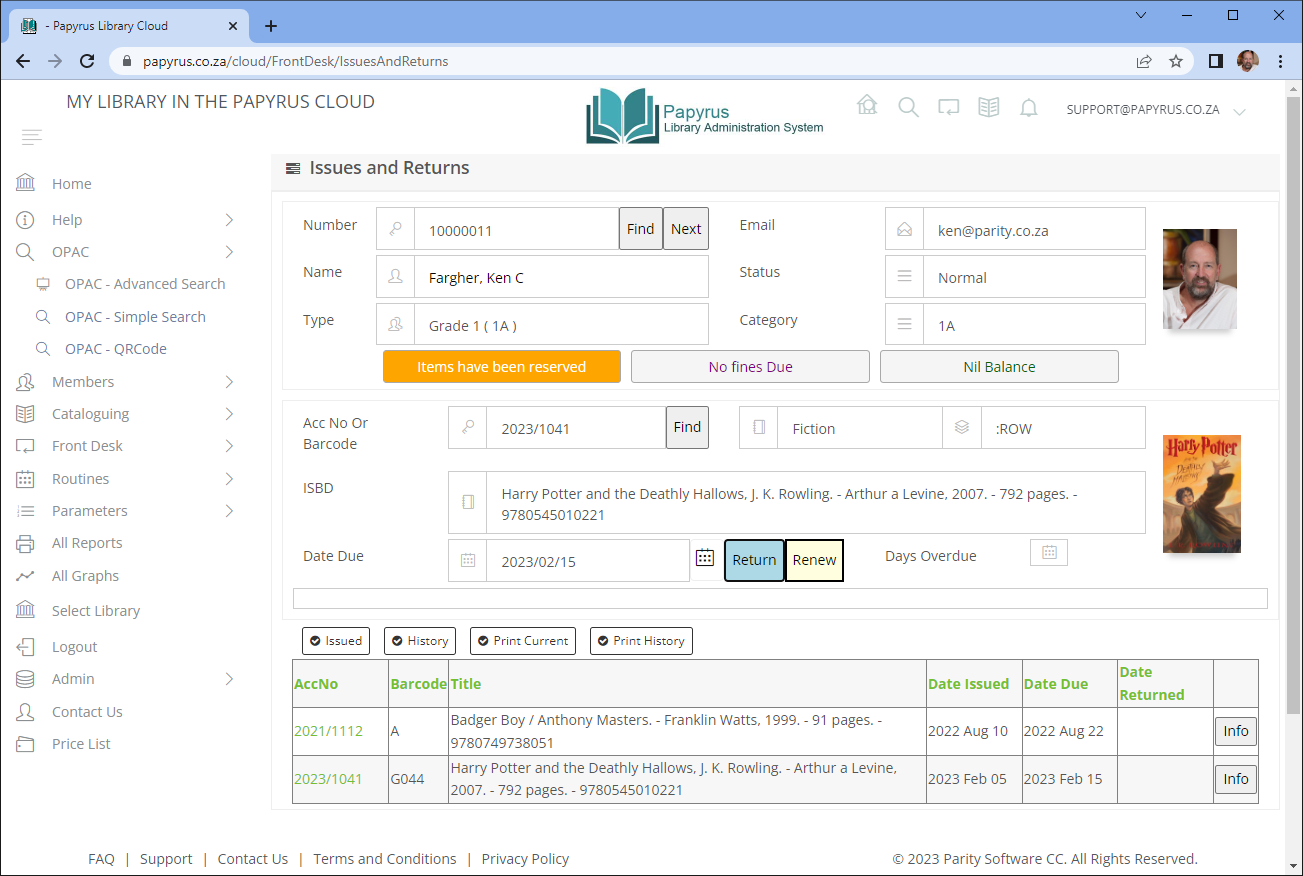
The book will then be returned and will be removed from the details show below in the table of books issued to the member
You have now completed all the basic steps of Issuing and returning a book that you created to a member that you created!